NP500L
EXCETEK CNC Wire EDM NP500L
EXCETEK CNC Wire EDM NP500L Are Finest CNC Wire EDM Machines With Excellent Precision And Reliability.
Travel
Travel - (X,Y)/(U,V)/Z - 500*300/120 * 120/310
Axes Control
Axes Control - XY Axis Linear Motor, UV Z Axis AC Servo Motor
Machine Dimension
Machine Dimension - 2590 X 2575 X 2165
SPECIFICATION
NP500L
Unit
Values

Machine feature
- Rigid U, V truss design
- Stainless steel worktable with hardness HRC 50°.
- Machine Casting is designed based on the FEA analysis for increasing the rigidity.
- Machine base with extra wide.
- Linear Sheft Motor Driver System
Mechanical Structure
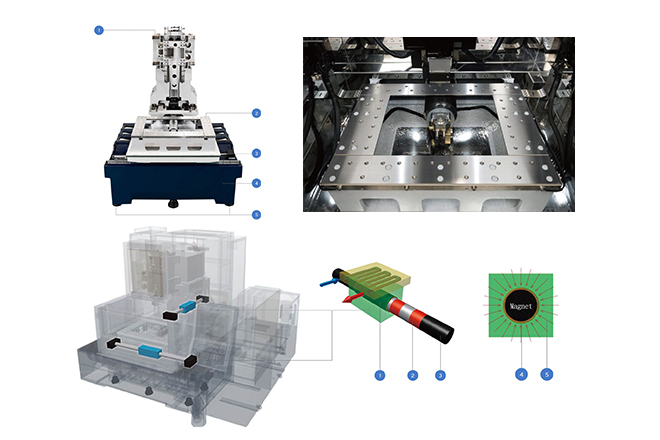
The machine provides the constant temperature for improving the accuracy while machining where the heat generated by the linear motor will affect the accuracy. The water circulation reduces the temperature generated by the linear electric motor from the magnetic field, with high thrust, high efficiency and low energy consumption.
Features such as a 0.1 μm high-resolution digital ruler and controller provide high-precision forming and ultra-fine finishing.
- Coil
- Magent
- Shaft
- Coil
- Magnetic flux
Improved Operability
4-side Hardened Stainless Steel Table
- It has certified the standards of TUV Certification for safety and metal desired design.
- Power slider door design to save installation space and light operation
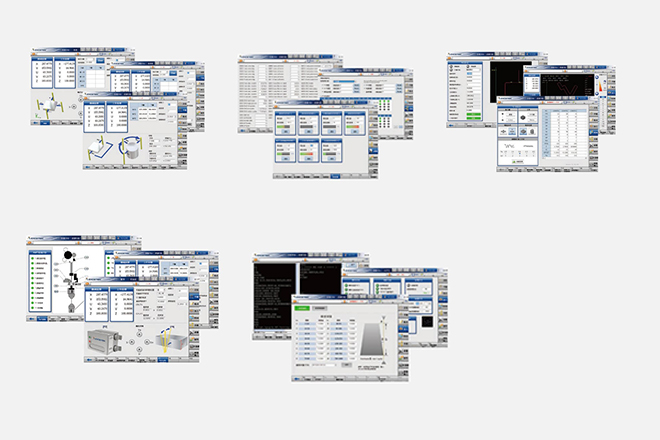
Intelligent machining mode
- https://www.excetek.com/images/im2.jpg
- https://www.excetek.com/images/im3.jpg
- https://www.excetek.com/images/im4.jpg
- https://www.excetek.com/images/im5.jpg
- https://www.excetek.com/images/im6.jpg
DPM - Digital Power Manager
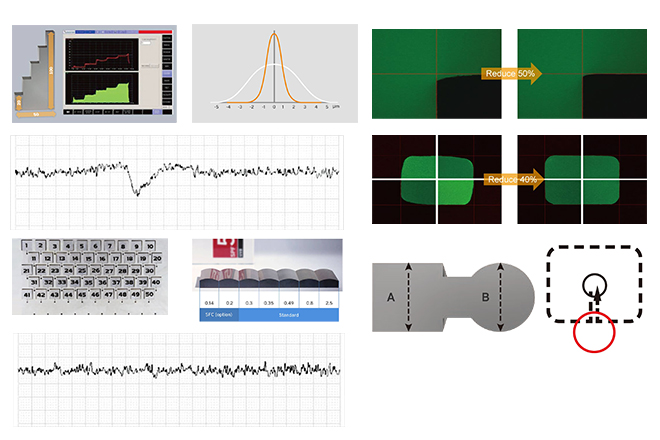
DPM is capable of detecting digital signale signals of sparking density, providing feedback to the CNC system and calculating the sparking size.
It controls the sparking energy, wire tension force and water pressure more precisely; increases cutting speed and accuracy when cutting on irregular thickness workpieces.
Comparison using DPM technology
| Mode | Speed mode | Accuracy mode |
| Enable | 39 Min | ±3µm |
| Disable | 58 Min | ±15µm |
(Under factory test conditions)
Stable discharge module
50 holes, one cut, and shape accuracy within 4 micron.
50 holes, one main cut and shape accuracy - https://www.excetek.com/images/dpm2.jpg
SGS vertification workpiece IMG - https://www.excetek.com/images/dpm3.jpg
SCC II Smart Corner Control
Corner eroded reduce 50% - https://www.excetek.com/images/dpm4.jpg
Shape error reduce 40% - https://www.excetek.com/images/dpm5.jpg
SFC-Super Finish Circuit
High frequency sparking energy provides Ra0.2um surface roughness with 1 rough cut plus 6 sking cuts.
- Material : Tungsten Carbide
- Thickness : 30mm
- Best Surface Roughness Ra 0.14 µm
https://www.excetek.com/images/dpm6.jpg
Entrance Mark Control
Concave section depth within surface roughness, Greatly reduce polishing time.
https://www.excetek.com/images/dpm7.jpg
No control : Entrance mark depth 6µ - https://www.excetek.com/images/dpm8.jpg
EM control : Concave section depth within surface roughness - https://www.excetek.com/images/dpm9.jpg
Smart Radius Control
https://www.excetek.com/images/dpm10.png
| Type | Without control | control Using control |
| A | 5.001 mm | 5.001 mm |
| B | 4.994 mm | 4.999 mm |
| Error | 7 µm | 2 µm |

Auto wire threading
200mm Submerge threading - https://www.excetek.com/images/aw7.jpg
200mm Submerge threading - https://www.excetek.com/images/aw8.jpg
400mm thickness threading in break point - https://www.excetek.com/images/aw9.jpg
High Speed Auto Wire Threading System
Workpiece thickness 100mm
- Wire annealing and cutting : 10 sec
- Threading : 10 sec
Reliable Auto Wire Threading system
In EXCETEK, AWT provides a sophisticated design which generates continuous unmanned operation for 24 hours. Unlike other systems it can thread from the point of the wire breakage or break point.
A water jet function enables the machine to thread workpieces up to 500mm.
On-line measurement system
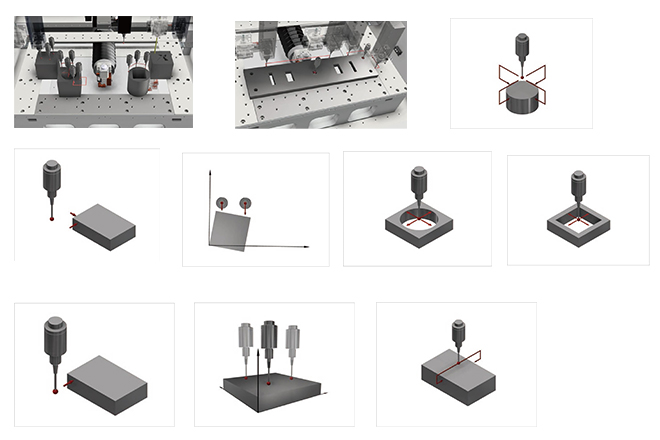
CBefore the machining, on-line measurement and calibration instead of the conventional one, significantly reduce the time to calibrate the workpiece. With the macro command the automatic measurement calibrates the reference point; enhance the machining accuracy. After machining, directly on-line measure the workpiece on the table; avoid the unexpected error from dismount/mount the workpiece.
Multi-workpiece machining
- Automatic compensating the 3D flatness of workpiece.
- Automatic compensating the parallelism of workpiece (AR)
- Automatic machining reference point measurement.
- Processing AWT automatic wire threading
- Go to the next workpiece to continue processing.
Processing automation
- Automatic compensating the parallelism of workpiece (AR)
- Automatically calibrate the reference point
- Processing AWT automatic wire threading
- Automatically measure the results after machining
- Export the measurement report
Automatic Measurement Application
- https://www.excetek.com/images/online3.jpg
- https://www.excetek.com/images/online4.jpg
- https://www.excetek.com/images/online5.jpg
- https://www.excetek.com/images/online6.jpg
- https://www.excetek.com/images/online7.jpg
- https://www.excetek.com/images/online8.jpg
- https://www.excetek.com/images/online9.jpg
- https://www.excetek.com/images/online10.jpg
Cutting Technology
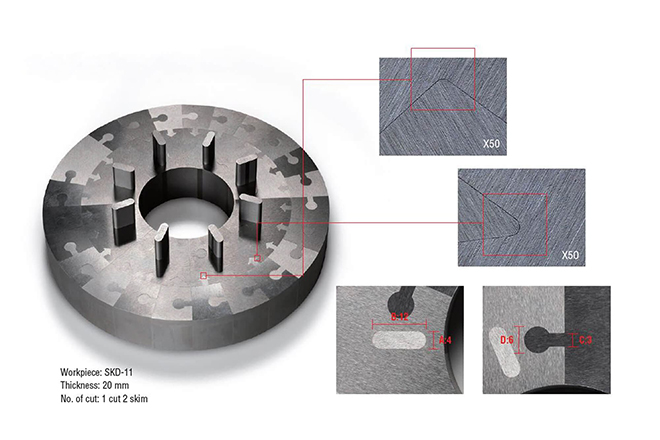
Type | Without control | Using control |
A | 0 | 0 |
B | 0 ~ -2 µm | -8 ~ -10 µm |
C | 0 | 0 |
D | 0 ~ -2 µm | -8 ~ -10 µm |


